Wednesday, February 25, 2015

Singer 640 Golden Touch And Sew

The Singer 640 is one of several models in the Touch And Sew series by Singer produced during the 1970s.   One of the most interesting aspects of the model was its ability to wind the bobbin in the bobbin carrier.  As a top loading full rotary hook sewing machine, the bobbin was placed on the carrier.  At the push of a lever or button, the assembly would raise or lower.  This permitted the machine to wind the bobbin, and then reset to sew.  Unfortunately, many of these machines suffered from minor adjustment issues from time to time requiring frequent repair by a sewing machine technician.
The Singer 640 offered straight stitch and zig zag with full stitch length and stitch width control.

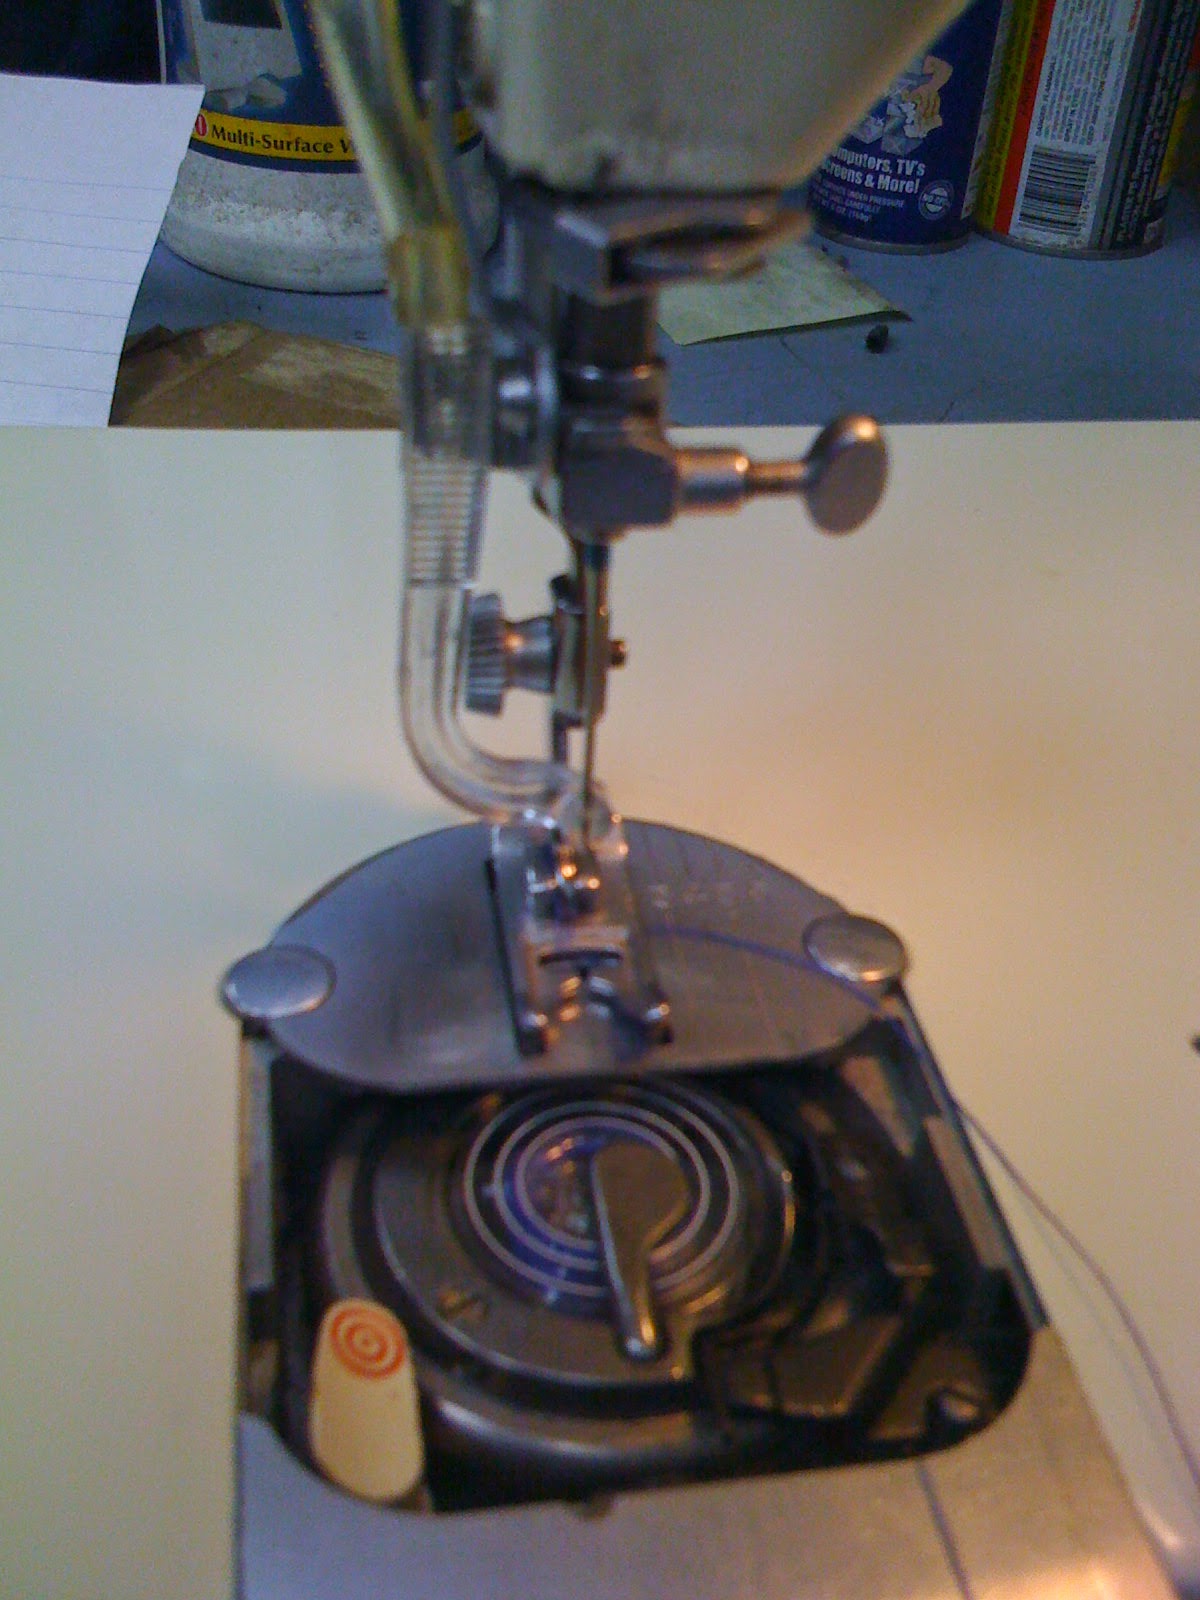
 
Note the outer silver grey colored circle.  This is the hook.  Inside the hook you will note the bobbin carrier also silver grey colored circle.  Inside the carrier you see the bobbin with two white stripes and a clamp holding it in place.   Also notice the black bracket extending from the bottom right.  This bracket has a spring on it facing the carrier.  This bracket must be properly set to permit the movement of the thread around the bobbin.  Too tight and the thread binds up.  Too lose and the thread flops around.  At the Far lower right is an eccentric used to adjust the bracket.  To remove the carrier, the black bracket must be lifted and moved to the right.

 
The front surface mounted tension assembly is held in place by a set screw under the cover.  It may be removed for service, replacement, or repair as needed.  Please note inside the tension assembly is a small metal rod about 1/25 inches long. Do not lose or forget to install this rod when servicing the tension assembly.  The presser bar lever presses against the pin or rod to open and close the tension assembly.  Always thread with presser foot in the up position relieving the pressure on the tensions.

 
Replacing the gears is pretty easy.  Always replace gears in sets.  A gear with 2 or more set screws will rest on the round portion of a shaft and may be adjusted around and along the shaft.  A gear with 1 set screw sits on the flat of the shaft and may only be adjusted back and forth along the length of the shaft.  To remove gears:  remove motor mount to the right and anything that prevents moving the shaft to the right.  Release guide set screws and move shaft to the right.  Remove gears.  Replace gears.  Reassemble paying very special attention to proper tooth alignment.  
 
The challenge of gear replacement is not removal and replacement of gears.  The challenge is resetting all affected settings on the sewing machine: feed, hook, needle bar, and over all balance.
 
Repairing older sewing machines is fun and rewarding.  To learn these special skills, check out Fix Sewing Machines Institute.  They offer a comprehensive correspondence program for sewing machine repair plus the top rated all brand sewing machine school.  For live classes see http://www.FixSewingMachines.com


Friday, August 15, 2014

Sewing Machine Repair Resources

In order to better serve those interested in sewing machine repair, we have added a few websites and videos that may be of interest.

Fix Sewing Machines Institute                                        http://www.fixsewingmachines.com.

Sewing Answers                                                             http://www.sewinganswers.com

Facebook For Fix Sewing Machines Institute             https://www.facebook.com/FixSewingMachines

Facebook For Sewing Answers                                   https://www.facebook.com/SewingAnswers

Sewing Machine Repair School                                   http://www.sewingmachinerepairschool.com

Sewing Machine Repair Courses                                 http://www.sewingmachinerepaircourses.com

Sewing Machine Repair Training                               http://www.sewingmachinerepairtraining.com

Sewing Machine Repair School Video                 
                        https://www.youtube.com/watch?feature=player_detailpage&v=g6v-zOjIK1M

Sewing Machine Repair Technician
                        https://www.youtube.com/watch?v=6NSrbv0TW7E&feature=player_detailpage

Fix Sewing Machine Institute Testimonial Videos
                       https://www.youtube.com/watch?feature=player_detailpage&v=HlCRL79692U

                       https://www.youtube.com/watch?v=ib1_knfgrr4&feature=player_detailpage

Sewing Machine Repair Disassembly Video
                        https://www.youtube.com/watch?v=KqdGGQwjwiA&feature=player_detailpage

Fix Sewing Machines Video
                       https://www.youtube.com/watch?v=KABZ6Zo8AH4&feature=player_detailpage


Sewing Machine Timing Video
                        https://www.youtube.com/watch?v=8H0BQVVaw0c&feature=player_detailpage

Bernina Sewing Machine Disassembly Video
                        https://www.youtube.com/watch?feature=player_detailpage&v=o0Zh2c3Pk44

Invention of the Sewing Machine Video
                       https://www.youtube.com/watch?feature=player_detailpage&v=VTlLuQTbxPg

Learn Sewing Machine Repair Video
                        https://www.youtube.com/watch?v=pm73_42jvws&feature=player_detailpage

Sewing Machine Repair Timing - 5 Principles Video
                      https://www.youtube.com/watch?v=AZ6yJd4s2_g&feature=player_detailpage

Sewing Machine Repair - Hook Systems
                      https://www.youtube.com/watch?v=y4RJmORYNVM&feature=player_detailpage

Sewing Machine Timings - Point Of Adjustment
                     https://www.youtube.com/watch?v=ccuTm2eMvbA&feature=player_detailpage

Friday, June 27, 2014

Repairing The Singer 6012C

Singer is the number one sewing machine brand of all time.  

Since the patent wars of the 1850's more Singers have been made and sold than any other sewing machine.  Isaac Singer was a canny marketer who watched all the advances made by others, and copied them, improved on them, and marketed them.  

There have been thousands of different models, but during the 1970's and later, Singer began to specialize in full rotary hook sewing machines.  Some models even wound the bobbin in the top loading bobbin carrier.

Singer 6012C is one of many top loading rotary hook sewing machines.  Singer sewing machine repair requires professional training because there is such a wide range of issues and models.
This machines offers straight stitch and zig zag sewing with three preset needle positions and a four step button hole.  This was a very popular sewing machine and thousands are still in use today.  Notice the front mounted bayonet styled upper tension assembly.


The open bottom of the machine reveals a cogged belt to control the rotary hook movement.  This belt often gets worn and needs replacement periodically.  It also shows two bar shafts to control the feed system. 

Notice the gear driving the hook assembly has two set screws on it.  This enables you to adjust the hook position at the gear, but it may also be adjusted at the opposite end of the belt.

 The tensioner shown here keeps the appropriate amount of pressure on the hook drive belt to keep it from slipping.  It should be adjusted so that the tension on the belt flexes just a bit.  The belt should not be overly tight or loose.  Professional sewing machine repair training gives the technician the knowledge and skill to repair sewing machine of all makes and models.

The needle plate has been removed to show the hook assembly.  Note this are must be regularly cleaned.  Place one drop of sewing machine oil on the hook race (the groove on the inside top of the hook assembly)  every few hours of sewing.

The plastic cam allows the machine to create different stitch types.  Note the metal finger the connects to the cam.  This finger rides over bumps and grooves on the cam moving the needle bar accordingly.


Professional sewing machine repair is a highly respected profession serving millions of passionate sewers, quilters, and embroiderers.   Learn how to repair sewing machines for fun or profit at Fix Sewing Machines Institute.  For details check out http://www.FixSewingMachines.com.
 

Thursday, May 29, 2014

Disassembly: How To Repair Sewing Machines


How To Disassemble A Sewing Machine.


One of the most time consuming parts of any sewing machine repair is the disassembly.  On many machines this is as simple as removing a few screws, but on other machines it can be a bit more complicated. 

Many of the newer machines use a snap fit system that requires the technician to find the snap points, and release them by pressing one side of the cover in while the other remains rigid.  Unless all the appropriate screws have been removed and the proper order followed, removing the covers can be quite frustrating. 

Keeping your parts including screws well organized is essential.  Otherwise, as you reassemble, you will find extra screws and the covers may not align.  For this reason, be sure to keep covers with their correct screws.  If necessary, tape the screws in place temporarily.  The more complicate the machine is, the more important organization of parts becomes.


Disassembly should proceed from right to left.  Remove the tray, the lower arm cover, and the needle bar cover.  Remove the needle, needle plate, bobbin carrier or case, and the hook cover and hook.  Begin removing screws across the back from right to left.  Remove any other screws as needed from hand wheel side, and bottom of the machine.

 
Once the covers have been removed, proceed to brush and blow away debris.  Use solvent to dissolve old lubrications.  Use pure clean sewing machine oil, and place one drop everywhere metal touches metal.


Notice this Brother XL sewing machine has an oscillating hook system.  You can see the bracket for the hook inside and the race outside.


To learn  more about sewing machine, serger repair, embroidery machine, and industrial machine repair, check out http://www.FixSewingMachines.com.  The Fix Sewing Machines Institute offers comprehensive sewing machine repair training in both live institutes and by correspondence.


Saturday, May 24, 2014

How To Repair Bernina Activa 130

BERNINA Activa 130


The Bernina Activa 130 is a popular and in many ways classic Bernina sewing machine.  Historically, the Bernina line has proudly used an oscillating hook system known as the CB Hook.  In an oscillating hook system, the hook is set to the left of the needle and moves from left to right behind the needle picking up the thread loop.  It draws the upper thread around the bobbin case containing the bobbin wrapping the upper thread around the lower thread.  Then hook retraces its way back to the original position to the left of the needle.


Above you can see the hook in the center.  Notice that it is shaped like a half moon.  The bobbin is inserted into the bobbin case shown on the right.  Another feature of the BERNINA line is its heavy duty presser foot series. 

With covers off you can see just how rugged its internal skeleton is.  Antique sewing machines commonly had an outer skeleton casting with parts inserted inside, but modern sewing machines usually have an internal skeleton or frame.  Parts are attached to this frame giving the machine great strength and stability.

Modern computerized sewing machines replace many of the gears, levers, and AC motors used in mechanical machines with electronics and DC Pulse motors.  This gives the user a much quieter sewing experience with far better control over the entire sewing process.  When repairs are needed on the computer side, it generally requires replacement of boards, motors, switches, and fuses.  Attempting to repair computer boards is not advisable.


This machine required replacement of small flat 12 volt bulb, and one of the two fuses on the power board.  Other possible parts commonly replaced include the timing belt, drive belt,  and power cord.


Older BERNINA sewing machines are fairly straight forward to work on, however, the newer more advanced machines are very complicated and should not be attempted by a novice.  If you have a BERNINA from the Artista series, it is best to have an experience BERNINA technician available.

To learn more about sewing machine repair, check out Fix Sewing Machines Institute at http://www.fixsewingmachines.com.  Live trainings and comprehensive correspondence courses teach technicians and hobbyists how to repair sewing machines for fun or profit.

Also check out our many sewing machine repair videos on youtube.com.

Needle Bar Movement                   http://youtu.be/zGuCsESCO-I     
Points Of Adjustment                     http://youtu.be/ccuTm2eMvbA
Technical Training                         http://youtu.be/6NSrbv0TW7E

Tuesday, May 13, 2014

Repairing A White Futura 464

Repair Sewing Machines: White Futura 464

 
It is important to understand the operation of a sewing machine from the standpoint of stitch formation and the design type of the machine.  Here we have a classic sewing machine with a side loading bobbin and an oscillating hook.  

When we understand the key elements going into how the stitches are formed, it becomes quite easy to adjust the machine.  For example, tensions consist of two thread sources with various guides, tensioners, twists, and turns.  One thread comes from above, and the other from below.  If the resistance on both top and bottom are equal, the thread will from a stitch knot inside the fabric.  If either one pulls harder than the other, that side of the fabric will collect excess threads. The same principle applies on this machine and virtually every other lockstitch sewing machine ever made.


The stitch selection may vary from machine to machine, but the function remains the same on most mechanical machines.  A lever is used to increase or decrease the stitch length.  On most machines stitch width and variations are added in similar fashion.


Sewing machine timing is not just a single adjustment.  Instead it involves the alignment of needle bar assembly, feed dog assembly, and hook assembly.  All three must be adjusted to work together. 


For Videos On Sewing Machine Repair check out the following:
Fix Sewing Machines Institute http://youtu.be/g6v-zOjIK1M
Sewing Machine Disassembly http://youtu.be/KqdGGQwjwiA
Sewing Machine Repair http://youtu.be/KABZ6Zo8AH4
Invention Of The Sewing Machine http://youtu.be/_LBWar-MF6A
 

Monday, December 2, 2013

Servicing a Brother CS80

Sewing Machine Repair may be as simple as replacing a needle, but it can be much more involved. Here is a Brother CS80 with covers removed so you can see what it looks like inside. You will notice that it has a shell construction rather than an internal frame or skeleton.  Many lower end sewing machines are made this way today.  It is less expensive to make and buy, but ii is also not very durable.  This machine has a rotary hook assembly with a top loading bobbin.  In most cases, adjustments are mechanical although the machine has circuit boards, pulse motors, and some computer control.  . 


For the most comprehensive training in sewing machine repair, check out Fix Sewing Machines Institute at http://www.fixsewingmachines.com.   Also see our videos on www.YouTube.com.


Friday, August 31, 2012

Sewing Machine Repair And Serger Threading

Threading a serger can be a challenge. 

While some people have difficulty threading regular serging machines, the serger expands threading issues if for no other reason than it adds multiple threads instead of just one.  Without thread there can be no serging.   Thread is an essential.  The serging machine uses thread to attach fabrics together. 

Some say it looks weird. It certainly does not look like sewing machines.  Since the introduction of the home serger, users have complained about just how hard it is to thread.  With multiple threads, needles, and strange looking gismos, it not only looks complicated, it is.  It not only feels like you have to twist and turn just to thread it, it does.

The other threads are drawn up through the thread rack, down through thread guides, through the tension assemblies, and then through either the lower looper or upper looper.  Caution: avoid tangling threads.  Often the user thinks the machines requires professional help like sewing machine repair.

The ordinary  sewing machine makes locked stitches by drawing the upper thread down while the hook wraps it around the bobbin thread.  In a serger, however, the hook and bobbin are replaced with a lower and upper looper.  The needles pull the threads from above through the fabric.  The lower looper picks up the needle threads and draws  the to the right.  Then the upper looper picks up the needle and lower looper threads and moves them back to the left around the stitch finger.  This produces a wrap around or over locking stitch.

Learn to sew and serge like a pro with the help of www.SewingAnswers.com where you find detailed instructions on how to sew, serge, quilt, and more.

Improper threading creates calamity.  Slight variations in threading occur from one serger to another, but the basics are essentially the same.  Always read and follow the user manuals instructions precisely. 

Elna, Brother, Viking, Bernette, Necchi, and many other brands of sergers are available today.  There are many configurations and models, but generally there is strong similarity in their threading.

So, how do you thread a serger?  Begin by lifting the presser foot.  This releases the pressure on the tension assemblies and make it much easier to thread them.  Find the thread that will be used by the upper looper. Bring it up through and over the thread rack.  Bring it down and through the thread guides on the machine.  Some machines have the thread woven through a couple of guides. 

Make sure the thread slips between the tension discs.  Some sergers will have surface mounted tensions that are easy to tell when they are properly threaded.  Others encase the tension in the front cover.  Just make sure the thread is properly seated in between the tension discs.  Of course, this cannot happen unless the presser foot is up.

Serger tension is a common source of problems.  Not only is it essential to properly seat the thread between the two round tension discs, the tension must balance with multiple threads.

Lifting the presser foot  before you start thread, releases the pressure on the tension assemblies making it easy to thread them.  Make sure each thread is drawn through the tension discs and held firmly in position.  If the presser foot is down, the thread (can|may|will ride along the edgeof the tension discs instead of flowing through them properly.  The solution is: lift the presser foot lever when you begin threading, and keep it up until  you thread the needle.

Proceed with threading the remaining thread guides and thread the upper looper.  This can be a bit of challenge requiring tweezers and the ability to stand on your head in some cases.  Then thread the lower looper followed by the needles.

When you reach the needles, draw  the thread through the serging machine take up lever, and back down through any remaining tension guides to the eye of the needle. 

Double check the tension  with the presser foot still up by slightly tugging on the end of the thread.  You should feel very little friction.  Now release the presser foot and try again.  You should find significant friction now.  You can double check each thread the same way just to make sure that the thread is properly seated in their appropriate tension assembly.

If a needle breaks, unthread the entire machine, and rethread in proper order.  If you need to change colors or thread spools, cut the thread just above the thread cone.  After setting the cone in place, tie the new thread to the original thread using a very small knot.  Gently advance the set of threads by slowly serging or by rotating the hand wheel until the tie off has passed beyond the thread finger.  Take special care when the knot reaches it guide hole.  This technique may be used for all or any one of the threads including needles and loopers. 

Rethreading is the first course of action when serger stitches mess up.  There are many possible reasons that threads break and stitches jam up. Examine the thread line for anything that might cause the problems, but essentially your first step is to rethread.

There is an exception to this threading system in the advanced jet air threading system of the Baby Lock sewing machine.  Baby Lock originated the home serger in 1964 and has led the market with advances and features unparalleled by any other brand.  The Baby Lock Imagine and Evolve sergers use an advanced devices that thread the serger by a simple press of a lever.  They use an advance thread management system that makes traditional tensions obsolete.  They may also be threaded in any order.  If a thread breaks, it is unnecessary to rethread the machine.

Discover how to repair sewing machines with the comprehensive training program on sewing machine repair available at http://www.FixSewingMachines.com.

Tuesday, July 31, 2012

Tips For Fixing Brother Sewing Machines


Have you ever used  a brother sewing machine?

These sewing machines  are known  for being the easiest to use sewing machines in the world. Unlike many of their competitors, these machines offer great features while being highly  convenient to  use and easy to learn.

Two groups  of sewing machines are made by the Japanese Brother International company. The Brother(R) brand is used for the low end line , and the Brother Pacesetter(R) brand is used for the mid to high end group . The company also  produces  machines for Tacony Corporation to their specifications and with their quality control coordination. This line  of machines is sold under the Baby Lock(R) brand name.

Where can  customers buy  these sewing machines?

Walmart, Kmart, and other mass merchandisers  market  the low end group . These sewing machines can also be purchased over the internet. The better  series of machines are only available through the authorized dealer network.

How do you decide which sewing machine to get when there are so many options? My mother had a Singer and my mother-in-law has a Viking. There are so many choices . Some are better than others. Some offer features unavailable on others.  Adding features like machine embroidery can add huge value and require the use of professionally created embroidery designs.

The ease of use and the  capabilities of the sewing machine far exceeds those of other sewing machines.

When you consider buying a new sewing machine or need to deal with one you already have, there are some important consideration over customer service ,  product training , and service .

Even these fine machines require periodic   maintenance . Lint, dirt, and debris collect inside the machine when it is used. Problems do happen. Lubricants dry out and decay. Things break.

You will love your machine. Keep in mind they require highly skilled and specialized technical taining and skills for proper sewing machine repair. The subtle complexities make it difficult for the ordinary  handyman  to do a proper job of servicing. Therefore,  maintenance  are not something you want to leave to just anyone. Demand a fully certified technician, and check out their experience and reputation.

The only place to find repair services is with an independent sewing machine technician, at an authorized dealer, or a regional service center. Check your  local phone directory .

You will find mid to high end sewing machines sold and serviced at your local authorized dealer. Over six hundred independent dealers serve the United States, mostly from larger cities. They can also be serviced at regional service centers. Mass merchandisers, department stores, and internet sites sell low end machines, but do not provide service or support. These are offered through the local or regional group.

If you live in an area where no local service centers are available, you can package your sewing machine. Ship it to a regional repair center. Here certified technicians provide you the skilled technical fixes  you want and need. Unfortunately, this choice  does get expensive and often takes longer than your local shop when available.

How can I do my own fixing ?

You can learn to  repair sewing machines your self. To do so you will need three things. First, you will need a good general sewing machine repair knowledge. Second, you will need access to parts. Third, you will need technical support. A professional tehnician can also  assist you when you get in over your head.

To learn service, you will need to learn the general skills of sewing machine  repair . You can do this through courses, books, and videos. You may be able to take an introductory class at a local dealership. Buy you can repair sewing machines yourself when you know how.

As a consumer, you would purchase any repair parts directly from your retail dealership or corporate store. If you became an authorized dealer yourself, you could then purchase at wholesale.

If you are interested in owning your own dealership, contact the company to see in your area is available. Brother does maintain restrictive territories for each of its dealers. You will be required to submit a detailed business plan, purchase the dealership for around $40,000, and complete their new dealer training program.

Finally, to maintenance  machines yourself, you will need expert assistance from a certified technician. Use the technician as a mentor, teacher, and friend; but be ready to pay for his services.

You will need help with diagnosis, complex repairs, and subtle adjustments from time to time.
Explore more about servicing your sewing machine, check into the extensive training resources for sewing machine repair  and learn to repair sewing machines yourself for fun or profit. Even get your own free beginner users ecourse.

Saturday, July 14, 2012

Tension Snags Part 2

In the previous post, we discovered that equalizing the drag  of the upper and lower thread systems produced balanced tensions. Unless the  pull equalized; tensions are faulty.

Thread systems on a sewing machine are much like a tug of war contest. The system that pulls the hardest gets the excess threads. If the top pulls harder than the bobbin, thread will pucker on top of the fabric. If the bobbin pulls harder, threads will collect under the fabric.

Problems may be from improper threading, improper adjustments, or snags in the thread line.

If you have problems with the tension on your sewing machine, first identify which thread system is pulling harder.  Is it the upper thread or lower thread.  Again this is a matter of looking for the excess threads on your test seam.  If the excess appears on the top, the pull up is greater than the pull down.  If excess appears under the fabric or on the bottowm, the pull down is greater than the pull up. 

Sewing machine repair is often the result of the user making a mistake.  It is important for ever user to learn to sew and master these basic fixes.  Understanding how to sew will reduce frustration and insure a technician will not be needed to repair sewing machines for you at every turn.

Check or rethread upper thread and lower thread. Test the upper tension at the needle and the bobbin tension at the carrier. Sew a test seam. Check and adjust. If thread collect under the fabric, tighten upper tension. If thread puckers on top of the fabric, loosen the upper tension.

If the problem is with improper threading, careful rethreading should solve the problem.  Rethreading upper thread and bobbin thread can make a big difference. 

If the problem is with improper adjustment, adjusting the upper tension will help.  However, sometimes the bobbin tension gets out of whack.  This is especially true if you change the size of thead in your bobbin.  Going from a larger thread to a smaller thread will cause a decrease in bobbin tension.  Going from smaller to larger thread will causse increased tension.  To adjust this, simply turn the tension adjusting screw to tighen or loosen.

The third problem source is a bit more troublesome.  Snags can distort tensions.  Often a slight burr or rough spot will intermittendly grab the thread increasing the tension, only to release it and leave a drop in tension balance.  To fix this problem, you must find the snags and eliminate them. 

Excess lint in the tension mechanisma is common.  Clean out the tension assemblies for upper and lower tensions. 

Burrs on the point of the hook are also common and must be smoothed. 

Before you begin sewing on your project, it is a good idea to test your tensions by performing a quick sewing test on test cloth or scrap fabric. Simply sew a four to five inch seam using a medium straight stitch and a medium zig zag stitch. Adjust the tensions until they properly balance.

You may see   irregularities on one side of a zig zag stitch and not on the other. Test and Set  until it looks the best you can make it. Some machines have design issues that make a precise  zig zag stitch almost impossible. Test  using a medium stitch width and length setting on the zig zag for better  results. If you want a perfect zig zag stitch on one of these older machines, think about  getting a newer  machine.

If adjusting the tension dials fails to balance the tensions, look for lint or dirt collected in the bobbin tension or upper tension assembly. Clean these out regularly. Lint can alter tensions and cause poor stitch quality. Also look for anything that might snag the thread. Burrs on the point of the needle or hook are common. Eliminate anything that might snag.

When you properly adjust tensions, sewing is fun.

Monday, May 7, 2012

What Is An Overlocking Serger?

Many sewing machine technicians are a bit threatened by sergers.  They do not see as many sergers as standard sewing machines, and sergers are very different from regular sewing machines.  After working for a while on sergers, however, they become far less intimidating and much easier to service.

Frequently, I find  active sewers who are unfamiliar with sergers.   Sometimes we get the idea that everybody already knows what we know, but when it comes to sergers they appear to be a bit of a mystery to a lot of people.

Have you ever wondered what people think about something?

I do?  When it comes to sergers I decided to find out.  I set out on a mission to ask complete strangers what a serger was.  The responses I got were amazing.

At the department store, people are busy looking for stuff themselves.  They usually, look past you and ignore your presence.  When you ask them a question, some people appear shocked or they just look past you in a blank stare.  Fortunately, a few people were friendly and really tried to help me figure out what a serger is.   People had some truly creative opinions.  A young boy thought it might be a team logo or a new video game.  A lady thought it was a new type of fruit.  One of the workers pointed me to hardware and said what I needed was a special kind of electrical fuse.

Now, your question remains.  What is a serger?

Unlike the ordinary  home sewing machine, the serger  is a  particular type of machine that sews a hem, overcasts the edge of the fabric, and trims the fabric all at one time.  Almost any sewing project can be accelerated by use of a serger whether the application is for utility (hidden away) or decorative to  embellish the project.  Note the serger does not do embroidery and does not follow embroidery designs.

In 1846, Elias Howe patented the first practical sewing machine, but it was not until 1881 that the first serger was introduced by the Merrow Sewing Machine Company.  This machine produced a two or three thread overlocking stitch often called a Merrow stitch.  This provided a huge advancement over the typical straight stitch machine.  The Merrow was able to sew a hem or seam while overcastting the edge of the fabric.  In some cases this was done without trimming, but usually it included blades that trimmed the fabric leaving a beautifully finished edge.  

It is interesting how words evolve over time.   The Merrow became the overlock and is most commonly referred to today as the serger.   The terms overedging, overcastting, overlocking, and serging are often used interchangeably.

Sergers were the domain of industry and factories until 1964, when the Baby Lock brand of home sergers launched.  Several engineers  at Juki had envisioned a scaled down version of the heavy industrial serger, but the Juki company was not interested.  So the designers  formed their own new company and launched Baby Lock home sergers.

Unlike the standard  sewing machine that uses needle and hook assemblies to create interlocking stitches, the serger uses devices called loopers.   A lower looper and an upper looper assist interact with the needle to create the overlocking stitches.   Instead of using a shuttle or bobbin, the serger uses multiple cones of thread guided through tension assemblies to the loopers and needle.   Sergers also use special needle plates with stitch fingers or horizontal needle fingers to help form the stitches. 

Sergers double the speed of ordinary  home sewing machines, but are far slower than their big sister industrial sergers.  Home sergers are designed to for convenience and creativity.  They are much lighter, smaller, sleeker, and more user friendly than the heavy duty industrial models.  Industrials commonly sew up to 9,500 stitches per minute, but only produce one overlocking  stitch.  Home sergers sew between 1,500 and 3,000 stitches per minute and may produce a dozen or two different overcastting  stitches.

Sewing machine repair and serger repair are very similar.  Although the serger replaces the hook with loopers, it is essentially an oscillating hook sewing machine.  With experience it is as easily repaired as other sewing machines.

Today Baby Lock offers a serger that uses up to eight cones of thread to produce as many as 86 different overlocking  stitches.  Sergers of many different brands today come in a variety of configurations, but generally you will find sergers that can sew using 2, 3, 4, 5, 6, 7, or 8 different threads. 

Today the home serger has become an integral part of a quality sewing room set up.  It is capable of streamlining sewing projects producing far better quality while cutting sewing time in half.  Yet, it does not replace the regular  sewing machine.

So, how do you reply to the question, What is a serger?  Is it your super sewing machine that seams, overcasts, and trim at the speed of light?  Is it your creative finishing machine?  Is it your overcastting, overedging, overlocking, serging machine?  Of course it is your serger.

To learn to sew and how to sew with a serger check out http://www.sewinganswers.com
To learn about sewing machine repair see http://www.fixsewingmachines.com 
To find quality sewing machines online see http://www.sewingmachinemall.com.
To find quality embroidery designs see http://www.libisembroidery.com.

Friday, April 20, 2012

Top Sewing Machine Questions

Question 1: What makes a sewing machine?

Since the first sewing machine was patented in 1846, it has essentially been a mechanical appliance used to connect materials together using needle and thread. Today, we think of the sewing machine largely as an appliance to join fabrics.

Question 2: Are there different types of sewing machines?

While many people think of sewing machines only in terms of their standard home sewing machine, there are hundreds of sewing machines designed for specific applications at home and in factories. Since sewing machine are either used in a home or factory setting we might say there are two broad kinds: Home and Commercial or Home and Industrial.

At home you will find the typical home sewing machine, a serger, an embroidery machine, an embellishing machine, quilting machines, a blind hemming machine, and sometimes a light industrial straight stitch or zig zag machine.

In industry, you will find much more rugged and faster sewing specialty machines often used for a single application. Here you can find walking foot machines, blind stitch machines, upholstery machines, leather machines, button machines, machines to make shoes, saddles, sails, and more.

Q3: What are the typical kinds of home sewing machines today?

All home sewing machines look about the same, but the insides have big differences. We can group them into three categories: mechanical, electronic, and computerized.  You can learn to sew and master the techniques of how to sew on even any of these, but there are specialized techniques that might require specialized sewing classes to master.

Inside a mechanical machine you discover an AC motor, gears, levers, and shafts. In electronic machines, you see electronic devices controlling power distribution and stitch selection.

Computerized sewing machines incorporate advanced technologies to provide power control, stitch formation, stitch information, and numerous convenience features.

Mechanicals are the most limited in features, stitches, and capabilities, while computerized machines offer the most features, stitches, and capabilities.

Question Four: Why do sewing machines range so much in price?

Sewing machines sell for between $100 and $12,000 dollars. The price clearly reflects a combination of considerations: dependability, durability, features, convenience, and capabilities. The more you pay the less frustration you get. The less you pay the less capability and performance you have.

Over $1,000 you find super quality sewing machines some with hundreds of stitches and even embroidery capabilities.

Around $500, you find a good solid machine with a limited stitch set.

Under $100, you get junk hardly worth taking home.

Question 5:  Why do we need a sewing machine?

The sewing machine is an amazingly versatile device that unleashes almost unlimited creative potential. You can use a sewing machine for garment construction, wearable art, embellishment, embroidery, endless home decorating projects, heirloom creations, quilting, crafting, and so much more. When you add all the specialty machine applications common in industry, sewing machines are vital for so many different tasks.

Q6: How do you choose the best sewing machine for you?

Your best sewing machine or the right one for me will do two essential things: Empower me to create and reduce your frustrations in the process. You can find your machine by making sure it has the capabilities and features you want and need. If you buy value instead of just price, you benefit every time you sew.

Question Seven: What is the difference between a regular sewing machine, a serger, and an embroidery machine?

At the center of every home sewing center is the home sewing machine. This is the versatile machine used for so many different applications involving seams. Still, if you enjoy sewing, you will treasure the benefits of the home serger. It actually seams, overcasts, and trims all in one high speed step saving time and energy. You may also enjoy the embroidery machine which is a single purpose machine designed to sew beautiful preprogrammed designs.

Question 8: Where can I get a new sewing machine?

While you can buy sewing machines over the internet and in department stores, these merchants offer no support, instruction, or service. You may not need these with a simple microwave oven, but to get the most from your sewing machine, you need all three: support, instruction, and service.

Better quality sewing machines are only sold through authorized sewing machine dealers. When you purchase a machine from one of these dealers, you receive much more than a machine in a box. You get expert advice and assistance. You get professional sewing machine repair and maintenance service. And you get very helpful sewing machine instruction.

To get the most from your sewing machine investment, find your trusted local sewing machine dealer.Get more about sewing machine repair with Dr. David Trumble's complete Sewing Machine Repair Manuals. Check out his free beginner's course. Also check out his other sewing resources learn to sew, how to sew, and other sewing sights including http://www.SewAndQuiltStore.com, http://www.SewingMachineMall.com, http://www.SewingAnswers.com, http://www.LibisEmbroidery.com and http://www.FixSewingMachines.com.

Wednesday, April 4, 2012

Embroidery Machine Repair Procedures

What is a repair? 

Does it require replacing parts?  In many cases, when you are working to repair sewing machines and embroidery machines, a good cleaning and a few adjustments are all that are needed to make a machine work like new.  However, is that really a repair?

In a sense, it is just a matter of words.  A customer might think a quick fix is better than a complete job.  It might save dollars.  However, if we forget about words like cleaning, servicing, and adjusting and just call it all repair; the customer gets what they really want.  The technician stops mixing words.

Embroidery machines like other sewing machines are vulnerable to debris, lint, dust, grease, grime, gunk, dried out lubricants, encrusted lubricants, and gummy stuff.  It is essential that these be removed. 

The goal of embroidery machine repair is to restore a machine to like new operating contition.  The machine should be capable of sewing out embroidery designs without mechanical difficulties.

A common temptation for technicians is to just make a quick adjustment or even replace a part and leave the insides of the machine full of crap.  This is a no no.  Always do a thorough cleaning and proper lubrication job.  This will make the machine last much longer, work better, and cause far less frustration.
 
Think back to the initial test on the machine.  What clues did you get?  Have a good cleaning and adjusting done the trick? Or, were there problems that require replacing parts?  Trace down the issues.  Inspect each possible source of the problems.  Check for wear, chips, breakage, burn spots, loose connections, etc.

In those rare instances when a part must be replaced, be sure to fix only what is broken.  The most common items to replace are belts, gears, and circuit boards.  The first two of these are straight forward mechanical tasks.  Remove and replace the part.

Circuit boards and electrical components are often a bit threatening to the novice technician.  They require a bit more caution than a mechanical fix.  First, be sure to unplug the power cord before working on the electronics of a machine.  Indeed, always unplug the machine before removing covers.

Careful inspection of electrical, electronic, and computer parts is essential.  Look for burn spots, misconnections, pinched or twisted wires.  Often a little wiggle or press down on a loose connection is all that is really needed.

Make every connection right.  Unless the connection is true, the proper electrical flow is impossible.  A loose connection may cause intermittent problems, but when everything is working the way it should, the electronics make life really good.

Static electricity is a technicians enemy.  A single discharge can ruin a circuit board.  Some manufacturers require elaborate static prevention measures to protect their circuitry.  In the sewing machine repair shop, a static free mat is vital.  Bernina requires the addition of a wrist band protector.
When you are working on delicate electronic parts, special tools are often needed.  Non-metallic probes, screw drivers, and other tools can be a big help.  Your electronics supply house should have an ample supply of specialty tools, mats, and devices to make your work with electronics easier.
More advanced embroidery equipment and sewing machines will use plug n play components.  These are easily removed and replaced.

Diagnosis is an art, but a variety of resources can be helpful.  An official service manual, an authorized technician specializing in you brand, or the manufacturers technical support line may offer invaluable help.

Once you identify the problem component, carefully remove it and replace it with a new part.  In some cases, manufacturers will offer refurbished parts.  Once installed, thoroughly test out the machine to insure its proper performance.

Dr. David Trumble's Free 7 Steps To Peak Performance is yours now for sewing machine repair.
To purchase your next sewing machine or embroidery machine online go to http://www.sewingmachinemall.com  .

Friday, December 2, 2011

Top Sewing Machine Questions

The Top Eight Sewing Machine Questions
by David Trumble

Q1: What makes a sewing machine?

Since the first sewing machine was patented in 1846, it has essentially been a mechanical appliance used to connect materials together using needle and thread. Today, we think of the sewing machine largely as an appliance to join fabrics.

Question 2: Are there different types of sewing machines?

While many people think of sewing machines only in terms of their standard home sewing machine, there are hundreds of sewing machines designed for specific applications at home and in factories. Since sewing machine are either used in a home or factory setting we might say there are two broad kinds: Home and Commercial or Home and Industrial. At home you will find the typical home sewing machine, a serger, an embroidery machine, an embellishing machine, quilting machines, a blind hemming machine, and sometimes a light industrial straight stitch or zig zag machine. In industry, you will find much more rugged and faster sewing specialty machines often used for a single application. Here you can find walking foot machines, blind stitch machines, upholstery machines, leather machines, button machines, machines to make shoes, saddles, sails, and more.

Q3: What are the typical kinds of home sewing machines today?

All home sewing machines look about the same, but the insides have big differences. We can group them into three categories: mechanical, electronic, and computerized. Inside a mechanical machine you discover an AC motor, gears, levers, and shafts. In electronic machines, you see electronic devices controlling power distribution and stitch selection. Computerized sewing machines incorporate advanced technologies to provide power control, stitch formation, stitch information, and numerous convenience features. Mechanicals are the most limited in features, stitches, and capabilities, while computerized machines offer the most features, stitches, and capabilities.

Question Four: Why do sewing machines range so much in price?

Sewing machines sell for between $100 and $12,000 dollars. The price clearly reflects a combination of considerations: dependability, durability, features, convenience, and capabilities. The more you pay the less frustration you get. The less you pay the less capability and performance you have. Over $1,000 you find super quality sewing machines some with hundreds of stitches and even embroidery capabilities. Around $500, you find a good solid machine with a limited stitch set. Under $100, you get junk hardly worth taking home.

Why do we need a sewing machine?

The sewing machine is an amazingly versatile device that unleashes almost unlimited creative potential. You can use a sewing machine for garment construction, wearable art, embellishment, embroidery, endless home decorating projects, heirloom creations, quilting, crafting, and so much more. When you add all the specialty machine applications common in industry, sewing machines are vital for so many different tasks.

Q6: How do you choose the best sewing machine for me?

You best sewing machine or the right one for me will do two essential things: Empower me to create and reduce your frustrations in the process. You can find your machine by making sure it has the capabilities and features you want and need. If you buy value instead of just price, you benefit every time you sew.

Question Seven: What is the difference between a regular sewing machine, a serger, and an embroidery machine?

At the center of every home sewing center is the home sewing machine. This is the versatile machine used for so many different applications involving seams. Still, if you enjoy sewing, you will treasure the benefits of the home serger. It actually seams, overcasts, and trims all in one high speed step saving time and energy. You may also enjoy the embroidery machine which is a single purpose machine designed to sew beautiful preprogrammed designs.

Question 8: Where can I get a new sewing machine?

While you can buy sewing machines over the internet and in department stores, these merchants offer no support, instruction, or service. You may not need these with a simple microwave oven, but to get the most from your sewing machine, you need all three: support, instruction, and service. Better quality sewing machines are only sold through authorized sewing machine dealers. When you purchase a machine from one of these dealers, you receive much more than a machine in a box. You get expert advice and assistance. You get professional repair and maintenance service. And you get very helpful sewing machine instruction. To get the most from your sewing machine investment, find your trusted local sewing machine dealer.

Get more about sewing machine repair with Dr. David Trumble's complete Sewing Machine Repair Manuals. Check out his free beginner's course. Also check out his other sewing resources learn to sew, how to sew, and other sewing sights including http://www.SewAndQuiltStore.com, http://www.SewingMachineMall.com, http://SewingAnswers.com, and http://www.FixSewingMachines.com.

Wednesday, May 18, 2011

Fix Sticky Serger Stitches

What Do You Do With Skipped And Sticky Serger Stitches?

When you push on the foot control, you expect your serger to zip along serging a perfect stitch in an endless seam. When the stitch fails to form or skips hear and there, it causes horrific frustration. The sheer number of threads make serging a challenge. It sews so fast, up to 1500 stitches per minute, that serging can be a bit unnerving.

Consistent stitching, proper thread placement, and fine balanced tensions form quality stitches. Puckers, irregularities, and loops are noticeably absent.

Failure to form a stitch and skipped stitches are two of the more frustrating challenges serger users experience. These problems require a concerted effort to identify the causes and find solutions.

The most common causes of skipped stitches and unformed stitches include needle problems, threading problems , thread issues, faulty tensions, fabric issues, snagging, and misalignment of either looper timing or needle bar height or both. Check each possible cause and eliminate one of the at a time.

Start by replacing the needle or needles involved. Needle burrs, flaws, and bends are common causes of skipped stitches. Make sure the needles are fully seated in their holders.

Serger needle positioning is critical. Some sergers use ordinary sewing needles that have flat back tops, but many use special needles with rounded tops. On the front of the needle is a groove for the thread to ride in while the needle goes down. On the back and just above the eye is a cut out space known as the scarf. The scarf must be at ninety degrees to the lower looper. Make sure the needle is straight forward and properly seated in its holder. Use the right needle for the application you are doing.

The needle bar height must be properly aligned in order for stitches to form. It can be dislodged by the needle striking hard surfaces, needle breakage, or by sewing through very heavy materials.

Threading is also a very common source of difficulties. To fix this problem, rethread properly. Be alert to anything that might snag the thread.

Not all threads are equal. Some thread work better, some worse. Rethread with separate color threads or easier tracking. Make sure tensions are right.

Generally, sergers work on all fabrics, however, certain challenges can emerge with super thin, slippery, or thicker fabrics require accommodations.

Failure to form stitches usually results from the same causes as skipped stitches, but the issues are more pronounced. It is a matter of degree. If a serger issue causes skipped stitches, it is only a matter of time before stitches fail to form at all.

Apply the same approaches to seek solutions. One additional tip, however, is to clear the stitch finger and draw the theads under and behind the presser foot prior to starting to serger.

Generally, when the stitch quality is less than acceptable there are some basic things to check every time. These include needles, thread and threading, tensions, loopers, snag causes, settings, and balance. Replacing needles properly, rethreading properly, and adjusting tension balance are the three basic approaches to solve stitch problems. Get help from our professional sewing machine technician if you continue seeing problems.
If you decide to consider buying a new serger, besure to check out the resources at www.SewingMachineMall.com. They offer great reviews and resources to help you find the best serger or sewing machine.

Learn information about how to repair a sewing machine from Dr. David Trumbles excellent courses and sewing machine repair book. Download a copy of his free beginner's course.